Manually Execute Pipeline#
This section shows each of the commands to run the ancestry prediction pipeline manually. You can run each step of the pipeline from the Singularity image downloaded in the Installation section which should help standardize execution of this pipeline across different computing systems.
Note
If you have multiple pools and/or multiple individuals in each pool, you will need to update the output directories to reflect this and parallelize accross each of these combinations (following bam subsetting if you multiplexed multiple individuals in a pool). The snakemake pipeline is designed to automatically parallelize these jobs and monitor the state of each job so we highly recommend leveraging the pipeline if you can do so with your data.
The general steps are:
Divide Bam File by Individual Optional
Index Bam File(s) Required
Freebayes SNP Calling Required
Lift hg38 to hg19 Optional
Convert vcf to Plink Required
Identify Common SNPs Between 1000G Data and Your Data Required
PAUSE - send results to Drew Neavin (d.neavin @ garvan.org.au)
Subset Data for Common SNPs Required
Prune the SNPs in LD Required
Filter 1000G SNPs for Pruned SNPs Required
Calculate PCs using 1000G Required
Plot PC Results Required
Setup#
There are a few variables that will be used throughout the example commands which are best to define in a file that you can easily run at each step or source for execution of each step.
$BIND- the path(s) on your system to bind to singularity when executing commands. By default, Singularity binds just the directory (and downstream dierectory and files) from your current working directory when executing the command. However, if you have some files elsewhere on your system, you can provide a parent directory to the singulairty command to indicate which additional directories to bind. Multiple directories can be included and separated by a comma (i.e. $DIR1,$DIR2)$SIF- the path to the singularity image downloaded in the Installation section$OUTDIR- the path to the output directory where all results will be written and saved
BIND = /bind/path
SIF = /path/to/singularity/image/ancestry_prediction_scRNAseq.sif
OUTDIR = /path/to/base/outdir
Steps#
1. Divide Bam File#
Optional
Expected Timing
~15-40 minutes when using 8 threads with 4G each
If you have multiple individuals per capture, you will need to do this step but if you only have one individual in your pool, you do not have to split the bam by individuals and you can proced directly to 2. Index Bam File(s)
In preparation for this step, we set some additional parameters and create the required output directory. The parameters that we use for the command in this step are
BAM=/path/to/bam/file.bam ### Path to bam file
ANNO_BARCODES=/path/to/annotated/barcodes.tsv ### Path to annotated barcodes
TAG="CB"
N=8

mkdir -p $OUTDIR/bams
The
$ANNO_BARCODESis the annotated barcodes file described in Data PreparationThe
$TAGis the tag used in your bam file to indicate cell barcodes. In 10x captures, this is ‘CB’ but could be different for different technologies
To divide the bam file into a single file for each individual in the pool, simply execute:
singularity exec --bind $BIND $SIF sinto filterbarcodes -b $BAM -c $ANNO_BARCODES --barcodetag $TAG --outdir $OUTDIR/bams --nproc $N
2. Index Bam File(s)#
Required
Expected Timing
< 5 min
The bam file(s) need to be indexed before SNP calling with freebayes. Of course, if your bam is already indexed, you can skip to Freebayes SNP Calling
The $BAM will be either your original bam file (if did not subset by individual in previous step) or one of the bam files subset by each individual in the pool
singularity exec --bind $BIND $SIF samtools index $BAM
3. Freebayes SNP Calling#
Required
Expected Timing
~12 and 36 hours with 8 to 16 threads with 4-16G each. The time for this step will vary greatly depending on the number of reads per capture captured and the number of cells per individual.
Freebayes will be used to call SNP genotypes from the bam file using known common SNP genotype locations based on 1000G data. In order to expedite this process, we suggest running each chromosome in parallel.
We have provided common SNP location bed files that can be used for calling SNPs with freebayes filtered by minor allele frequency for each chromosome.
The files contain SNPs on either hg19/GRCh37 or hg38/GRCh38 and either have ‘chr’ encoding or not for each chromosome (‘chr1’ vs 1) and are located in the /opt directory in the ancestry_prediction_scRNAseq.sif image.
You will be able to use these files from directly within the ancestry_prediction_scRNAseq.sif image.
The table below explains the location that you should use depending on your data.
The * indicates that there is a different file for each chromosome from 1 to 22.
Genome |
Chr Encoding |
vcf File |
|---|---|---|
GRCh37 |
No ‘chr’ |
|
‘chr’ encoding |
|
|
GRCh38 |
No ‘chr’ |
|
‘chr’ encoding |
|
Define some variables to execute the freebayes SNP calling
The $TARGETS is the the bed file containing the common SNP locations in the ancestry_prediction_scRNAseq.sif image.
For example for chromosome 1:
N=8
TARGETS=/opt/GRCh37_1000G_MAF0.01_GeneFiltered_NoChr/GRCh37_1000G_MAF0.01_GeneFiltered_NoChr_1.bed
FASTA=/path/to/reference/fasta.fa
Here’s an example command to run freebayes to identify the SNP genotypes for the individual in the bam file for chromosome 1 but as we mentioned above, we suggest that you run each chromosome in parallel to expedite this step:
export TMPDIR=/tmp
singularity exec --bind $BIND $SIF freebayes -f $FASTA -iXu -C 2 -q 20 -n 3 -E 1 -m 30 --min-coverage 6 --limit-coverage 100000 --targets $BED_DIR/GRCh38_1000G_MAF0.01_GeneFiltered_NoChr_1.bed $BAM > $OUTDIR/freebayes_chr1.vcf
4. Merge Freebayes Results#
Required
Since we ran freebayes separately on each chromosome, we need to combine each of the results into a single file for downstream processing:
singularity exec --bind $BIND $SIF bcftools concat -Ov $OUTDIR/freebayes_chr*.vcf > $OUTDIR/freebayes.vcf
5. Lift hg38 to hg19#
Optional
Expected Timing
< 10 min
We currently only provide reference 100G data for ancestry annotation on hg19 (GCh37).
If your sequence data was aligned to hg38 (GRCh38), you will need to lift it to hg19 for ancestry annotation with 1000G data.
We have provided chain files in the Singularity image that can be used for lifting the data between hg38 and hg19:
/opt/ancestry_prediction_scRNAseq/refs/GRCh38_to_GRCh37.chain- Does not contain ‘chr’ enchoding (i.e. 1 and not chr1)/opt/ancestry_prediction_scRNAseq/refs/hg38ToHg19.over.chain- Does contain ‘chr’ enchoding (i.e. chr1 and not 1)
Define some variables to execute CrossMap to lift the data from hg38 to hg19
CHAIN=/opt/ancestry_prediction_scRNAseq/refs/GRCh38_to_GRCh37.chain ## Change this to the correct chain file for your data
FASTA=/path/to/reference/fasta.fa
Run CrossMap to lift the data from hg19 to hg38:
singularity exec --bind $BIND $SIF CrossMap.py vcf $CHAIN $OUTDIR/freebayes.vcf $FASTA $OUTDIR/freebayes_hg19.vcf
6. Convert vcf to Plink#
Required
Expected Timing
< 5 min
First, convert the vcf to the plink2 pgen files. We use max-alleles 2 because downstream softwares won’t be able to deal with multi-allelic sites.
The $VCF will be either $OUTDIR/freebayes.vcf (if your sequence data was mapped to hg19/GRCh37) or $OUTDIR/freebayes_hg19.vcf (if your sequence data was mapped to hg38/GRCh38).
singularity exec --bind $BIND $SIF plink2 --vcf $VCF --make-pgen --out $OUTDIR/freebayes --max-alleles 2
Freebayes doesn’t provide an ID for each SNP that it calls but that is important for downstream SNP filtering functions so we will create a pvar file that has IDs we will make from the chromosome, basepair, allele 1 and allele 2
singularity exec --bind $BIND $SIF cp $OUTDIR/freebayes.pvar $OUTDIR/freebayes.pvar_original
singularity exec --bind $BIND $SIF sed -i 's/^chr//g' $OUTDIR/freebayes.pvar ### The 1000G reference that will be used doesn not have 'chr' enccoding so we will remove it if used in your files
singularity exec --bind $BIND $SIF grep "#" $OUTDIR/freebayes.pvar > $OUTDIR/freebayes_tmp.pvar
singularity exec --bind $BIND $SIF grep -v "#" $OUTDIR/freebayes.pvar | awk 'BEGIN{FS=OFS="\\t"}{print $1 FS $2 FS $1 "_" $2 "_" $4 "_" $5 FS $4 FS $5 FS $6 FS $7}' >> $OUTDIR/freebayes_tmp.pvar
singularity exec --bind $BIND $SIF cp $OUTDIR/freebayes_tmp.pvar $OUTDIR/freebayes.pvar
7. Identify Common SNPs Between 1000G Data and Your Data#
Required
Expected Timing
< 5 min
Next, we need to subset the variants for just those that are in common between the SNP genotypes called from freebayes and those called from the 1000G data.
Note
The 1000G data is located in the Singularity image at /opt/1000G/all_phase3_filtered.pvar so you can use them directly from that location as demonstrated in the below commands.
Use awk to pull SNPs that are on the same chromosomes and have the same alleles
singularity exec --bind $BIND $SIF awk 'BEGIN{FS=OFS="\t"}NR==FNR{a[$1,$2,$4,$5];next} ($1,$2,$4,$5) in a{print $3}' $OUTDIR/freebayes.pvar /opt/1000G/all_phase3_filtered.pvar | sed '/^$/d' > $OUTDIR/common_snps/snps_1000g.tsv
singularity exec --bind $BIND $SIF awk 'BEGIN{FS=OFS="\t"}NR==FNR{a[$1,$2,$4,$5];next} ($1,$2,$4,$5) in a{print $3}' /opt/1000G/all_phase3_filtered.pvar $OUTDIR/freebayes.pvar | sed '/^$/d' > $OUTDIR/common_snps/snps_data.tsv
8. Get the SNPs in Common Across all Pools#
Required
Expected Timing
< 10 min
Next, we need to identify the SNPs that are in common across all the pools (and individuals if you had multiple individuals within a given pool). If you only have one pool, you will not need to do this step
Define some variables to get the common SNPs across all the pools
META=/path/to/metadata.tsv
The metadata file is the Sample Metadata File in the Data Preparation documentation.
singularity exec --bind $BIND $SIF Rscript /opt/ancestry_prediction_scRNAseq/scripts/common_snps.R $META $OUTDIR
9. Subset 1000G Data for Common SNPs#
Required
Expected Timing
< 10 min
After you have received the common SNPs file across all sites ($COMMON_SNPS), you can subset the 1000G and freebayes SNP data to the common SNPs.
We will use --rm-dup force-first to help deal with possible duplicate entries for the same SNP called by freebayes.
Note
The /opt/1000G/all_phase3_filtered path below is the 1000G reference base filename in the ancestry_prediction_scRNAseq.sif singularity image.
You can use the file directly from the image.
mkdir $OUTDIR/filter_1000g

### First need to subset the 1000g snps for the SNPs common to all sites, pools and individuals ###
singularity exec --bind $BIND $SIF grep -v "#" /opt/1000G/all_phase3_filtered.pvar | awk 'BEGIN{FS=OFS="\t"}{print $3}' > $OUTDIR/filter_1000g/all_1000g_snps.tsv
singularity exec --bind $BIND $SIF Rscript /opt/ancestry_prediction_scRNAseq/scripts/subset_1000g_snps.R $COMMON_SNPS $OUTDIR/filter_1000g/all_1000g_snps.tsv $OUTDIR

### Subset the freebayes-called snps for the new snps ###
singularity exec --bind $BIND $SIF plink2 --threads 2 --pfile /opt/1000G/all_phase3_filtered --extract $OUTDIR/snps_1000g_common_across_sites.tsv --make-pgen --out $OUTDIR/filter_1000g/subset_1000g
10. Prune the SNPs in LD#
Required
Expected Timing
< 5 min
Next, filter the SNPs for those that are not in linkage disequilibrium so we have unique representation for creating PCs:
singularity exec --bind $BIND $SIF plink2 --threads $N --pfile $OUTDIR/filter_1000g/subset_1000g \
    --indep-pairwise 50 5 0.5 \
    --out $OUTDIR/filter_1000g/subset_pruned_1000g
11. Filter the 1000G and Freebayes SNPs for Pruned SNPs#
Required
Expected Timing
< 5 min
We will filter the 1000G data for the SNPs in common across all sites. In addition, we’ll ensure that the chromosome encoding for chromosomes X, Y and mitochondria are consistent with what is required for plink.
The only variable that needs to be defined is $N which is the number of threads you would like to use for this command:
singularity exec --bind $BIND $SIF plink2 --threads $N --pfile $OUTDIR/filter_1000g/subset_1000g --extract $OUTDIR/filter_1000g/subset_pruned_1000g.prune.out --make-pgen --out $OUTDIR/filter_1000g/subset_pruned_1000g

singularity exec --bind $BIND $SIF sed -i 's/^X/23/g' $OUTDIR/filter_1000g/subset_pruned_1000g.pvar
singularity exec --bind $BIND $SIF sed -i 's/^Y/24/g' $OUTDIR/filter_1000g/subset_pruned_1000g.pvar
singularity exec --bind $BIND $SIF sed -i 's/^XY/25/g' $OUTDIR/filter_1000g/subset_pruned_1000g.pvar
singularity exec --bind $BIND $SIF sed -i 's/^MT/26/g' $OUTDIR/filter_1000g/subset_pruned_1000g.pvar
12. Filter Freebayes SNPs for Pruned SNPs#
Required
Expected Timing
< 5 min
The only variable that needs to be defined is $N which is the number of threads you would like to use for this command.
The $COMMON_SNPS is the common SNPs file across all sites:
singularity exec --bind $BIND $SIF plink2 --threads $N --pfile $OUTDIR/freebayes --extract $COMMON_SNPS --rm-dup 'force-first' --make-pgen --out $OUTDIR/common_snps/subset_data


### If have comments in the freebayes pvar file, need to transfer them
if [[ $(grep "##" $OUTDIR/common_snps/subset_data.pvar | wc -l) > 0 ]]
then
    singularity exec --bind $BIND $SIF grep "##" $OUTDIR/common_snps/subset_data.pvar > $OUTDIR/common_snps/subset_pruned_data_1000g_key.txt
fi

singularity exec --bind $BIND $SIF awk -F"\\t" 'BEGIN{OFS=FS = "\\t"} NR==FNR{a[$1 FS $2 FS $4 FS $5] = $0; next} {ind = $1 FS $2 FS $4 FS $5} ind in a {print a[ind], $3}' $OUTDIR/filter_1000g/subset_pruned_1000g.pvar $OUTDIR/common_snps/subset_data.pvar | \
  singularity exec --bind $BIND $SIF grep -v "##" >> $OUTDIR/common_snps/subset_pruned_data_1000g_key.txt

singularity exec --bind $BIND $SIF grep -v "##" $OUTDIR/common_snps/subset_pruned_data_1000g_key.txt | \
  singularity exec --bind $BIND $SIF awk 'BEGIN{FS=OFS="\t"}{print $NF}' > $OUTDIR/common_snps/subset_data.prune.out

singularity exec --bind $BIND $SIF plink2 --threads $N --pfile common_snps/subset_data --extract $OUTDIR/common_snps/subset_data.prune.out --rm-dup 'force-first' --make-pgen 'psam-cols='fid,parents,sex,phenos --out $OUTDIR/common_snps/subset_pruned_data

singularity exec --bind $BIND $SIF cp $OUTDIR/common_snps/subset_pruned_data.pvar $OUTDIR/common_snps/subset_pruned_data_original.pvar

singularity exec --bind $BIND $SIF grep -v "#" $OUTDIR/common_snps/subset_pruned_data_original.pvar | \
  singularity exec --bind $BIND $SIF awk 'BEGIN{FS=OFS="\t"}{print($3)}' > $OUTDIR/common_snps/SNPs2keep.txt

singularity exec --bind $BIND $SIF grep "#CHROM" $OUTDIR/common_snps/subset_pruned_data_1000g_key.txt > $OUTDIR/common_snps/subset_pruned_data.pvar

singularity exec --bind $BIND $SIF grep -Ff $OUTDIR/common_snps/SNPs2keep.txt $OUTDIR/common_snps/subset_pruned_data_1000g_key.txt >> $OUTDIR/common_snps/subset_pruned_data.pvar

singularity exec --bind $BIND $SIF awk 'BEGIN{FS=OFS="\t"}NF{NF-=1};1' < $OUTDIR/common_snps/subset_pruned_data.pvar > $OUTDIR/common_snps/subset_pruned_data_temp.pvar

singularity exec --bind $BIND $SIF grep "##" $OUTDIR/filter_1000g/subset_pruned_1000g.pvar > $OUTDIR/common_snps/subset_pruned_data.pvar

singularity exec --bind $BIND $SIF sed -i "/^$/d" $OUTDIR/common_snps/subset_pruned_data_temp.pvar

singularity exec --bind $BIND $SIF cat $OUTDIR/common_snps/subset_pruned_data_temp.pvar >> $OUTDIR/common_snps/subset_pruned_data.pvar

singularity exec --bind $BIND $SIF plink2 --rm-dup 'force-first' --threads $N --pfile $OUTDIR/common_snps/subset_pruned_data --make-pgen 'psam-cols='fid,parents,sex,phenos --out $OUTDIR/common_snps/final_subset_pruned_data
13. Update Chromosome IDs#
Required
Expected Timing
< 5 min
Plink has some requirements for the chromosome IDs for SNPs on the X, Y and MT chromosomes - they need to be updated to numeric. Update the chromosome IDs to ensure compatibility with plink.
singularity exec --bind $BIND $SIF sed -i 's/^X/23/g' $OUTDIR/common_snps/split/final_subset_pruned_data.pvar
singularity exec --bind $BIND $SIF sed -i 's/^Y/24/g' $OUTDIR/common_snps/split/final_subset_pruned_data.pvar
singularity exec --bind $BIND $SIF sed -i 's/^XY/25/g' $OUTDIR/common_snps/split/final_subset_pruned_data.pvar
singularity exec --bind $BIND $SIF sed -i 's/^MT/26/g' $OUTDIR/common_snps/split/final_subset_pruned_data.pvar
14. Calculate PCs for 1000G#
Required
Expected Timing
< 5 min
Next, calculate the principal components using the 1000G SNPs (alrleady filtered for the same SNPs as your dataset).
Again, the only additional variable that you need to define is the number of threads ($N) you want to use to calculate the PCs:
singularity exec --bind $BIND $SIF plink2 --threads $N --pfile $OUTDIR/filter_1000g/subset_pruned_1000g \
    --freq counts \
    --pca allele-wts \
    --out $OUTDIR/filter_1000g/subset_pruned_1000g_pcs
15. Project 1000G and Freebayes Data in PCs#
Required
Expected Timing
< 5 min
Next, project the 1000G and freebayes SNPs in the PCs calculated in the last step.
Again, the only additional variable that you need to define is the number of threads ($N) you want to use to calculate the PCs:
export OMP_NUM_THREADS=$N

singularity exec --bind $BIND $SIF plink2 --threads $N --pfile $OUTDIR/common_snps/final_subset_pruned_data \
    --read-freq $OUTDIR/filter_1000g/subset_pruned_1000g_pcs.acount \
    --score $OUTDIR/filter_1000g/subset_pruned_1000g_pcs.eigenvec.allele 2 5 header-read no-mean-imputation \
            variance-standardize \
    --score-col-nums 6-15 \
    --out $OUTDIR/pca_projection/final_subset_pruned_data_pcs

singularity exec --bind $BIND $SIF plink2 --threads $N --pfile $OUTDIR/filter_1000g/subset_pruned_1000g \
    --read-freq $OUTDIR/filter_1000g/subset_pruned_1000g_pcs.acount \
    --score $OUTDIR/filter_1000g/subset_pruned_1000g_pcs.eigenvec.allele 2 5 header-read no-mean-imputation \
            variance-standardize \
    --score-col-nums 6-15 \
    --out $OUTDIR/filter_1000g/subset_pruned_1000g_pcs_projected
16. Plot PC Results#
Required
Expected Timing
< 5 min
Lastly, we can predict sample SNP-based ancestry and produce some figures for visualization using our wrapper script:
singularity exec --bind $BIND $SIF echo $OUTDIR/pca_sex_checks_original/ > $OUTDIR/pca_sex_checks_original/variables.tsv
singularity exec --bind $BIND $SIF echo $OUTDIR/pca_projection/final_subset_pruned_data_pcs.sscore >> $OUTDIR/pca_sex_checks_original/variables.tsv
singularity exec --bind $BIND $SIF echo $OUTDIR/filter_1000g/subset_pruned_1000g_pcs_projected.sscore >> $OUTDIR/pca_sex_checks_original/variables.tsv
singularity exec --bind $BIND $SIF echo $OUTDIR/common_snps/subset_1000g.psam >> $OUTDIR/pca_sex_checks_original/variables.tsv
singularity exec --bind $BIND $SIF Rscript /opt/ancestry_prediction_scRNAseq/scripts/PCA_Projection_Plotting_original.R $OUTDIR/pca_sex_checks_original/variables.tsv
Results#
After running the final step, you should have the following results directories.
We’ve highlighted the key results files (Ancestry_PCAs.png and ancestry_assignments.tsv):
.
├── common_snps
│   ├── final_subset_pruned_data.log
│   ├── final_subset_pruned_data.pgen
│   ├── final_subset_pruned_data.psam
│   ├── final_subset_pruned_data.pvar
│   ├── snps_1000g.tsv
│   ├── SNPs2keep.txt
│   ├── snps_data.tsv
│   ├── subset_data.log
│   ├── subset_data.pgen
│   ├── subset_data.prune.out
│   ├── subset_data.psam
│   ├── subset_data.pvar
│   ├── subset_pruned_data_1000g_key.txt
│   ├── subset_pruned_data.log
│   ├── subset_pruned_data_original.pvar
│   ├── subset_pruned_data.pgen
│   ├── subset_pruned_data.psam
│   ├── subset_pruned_data.pvar
│   └── subset_pruned_data_temp.pvar
├── freebayes_hg19.vcf
├── freebayes_hg19.vcf.unmap
├── freebayes.log
├── freebayes.pgen
├── freebayes.psam
├── freebayes.pvar
├── freebayes.pvar_original
├── freebayes_tmp.pvar
├── freebayes.vcf
├── pca_projection
│   ├── final_subset_pruned_data_pcs.log
│   └── final_subset_pruned_data_pcs.sscore
└── pca_sex_checks_original
    ├── ancestry_assignments.tsv
    ├── Ancestry_PCAs.png
    └── variables.tsv
The
Ancestry_PCAs.pngfigure shows the 1000G individual locations in PC space compared to the individuals in each pool. For example: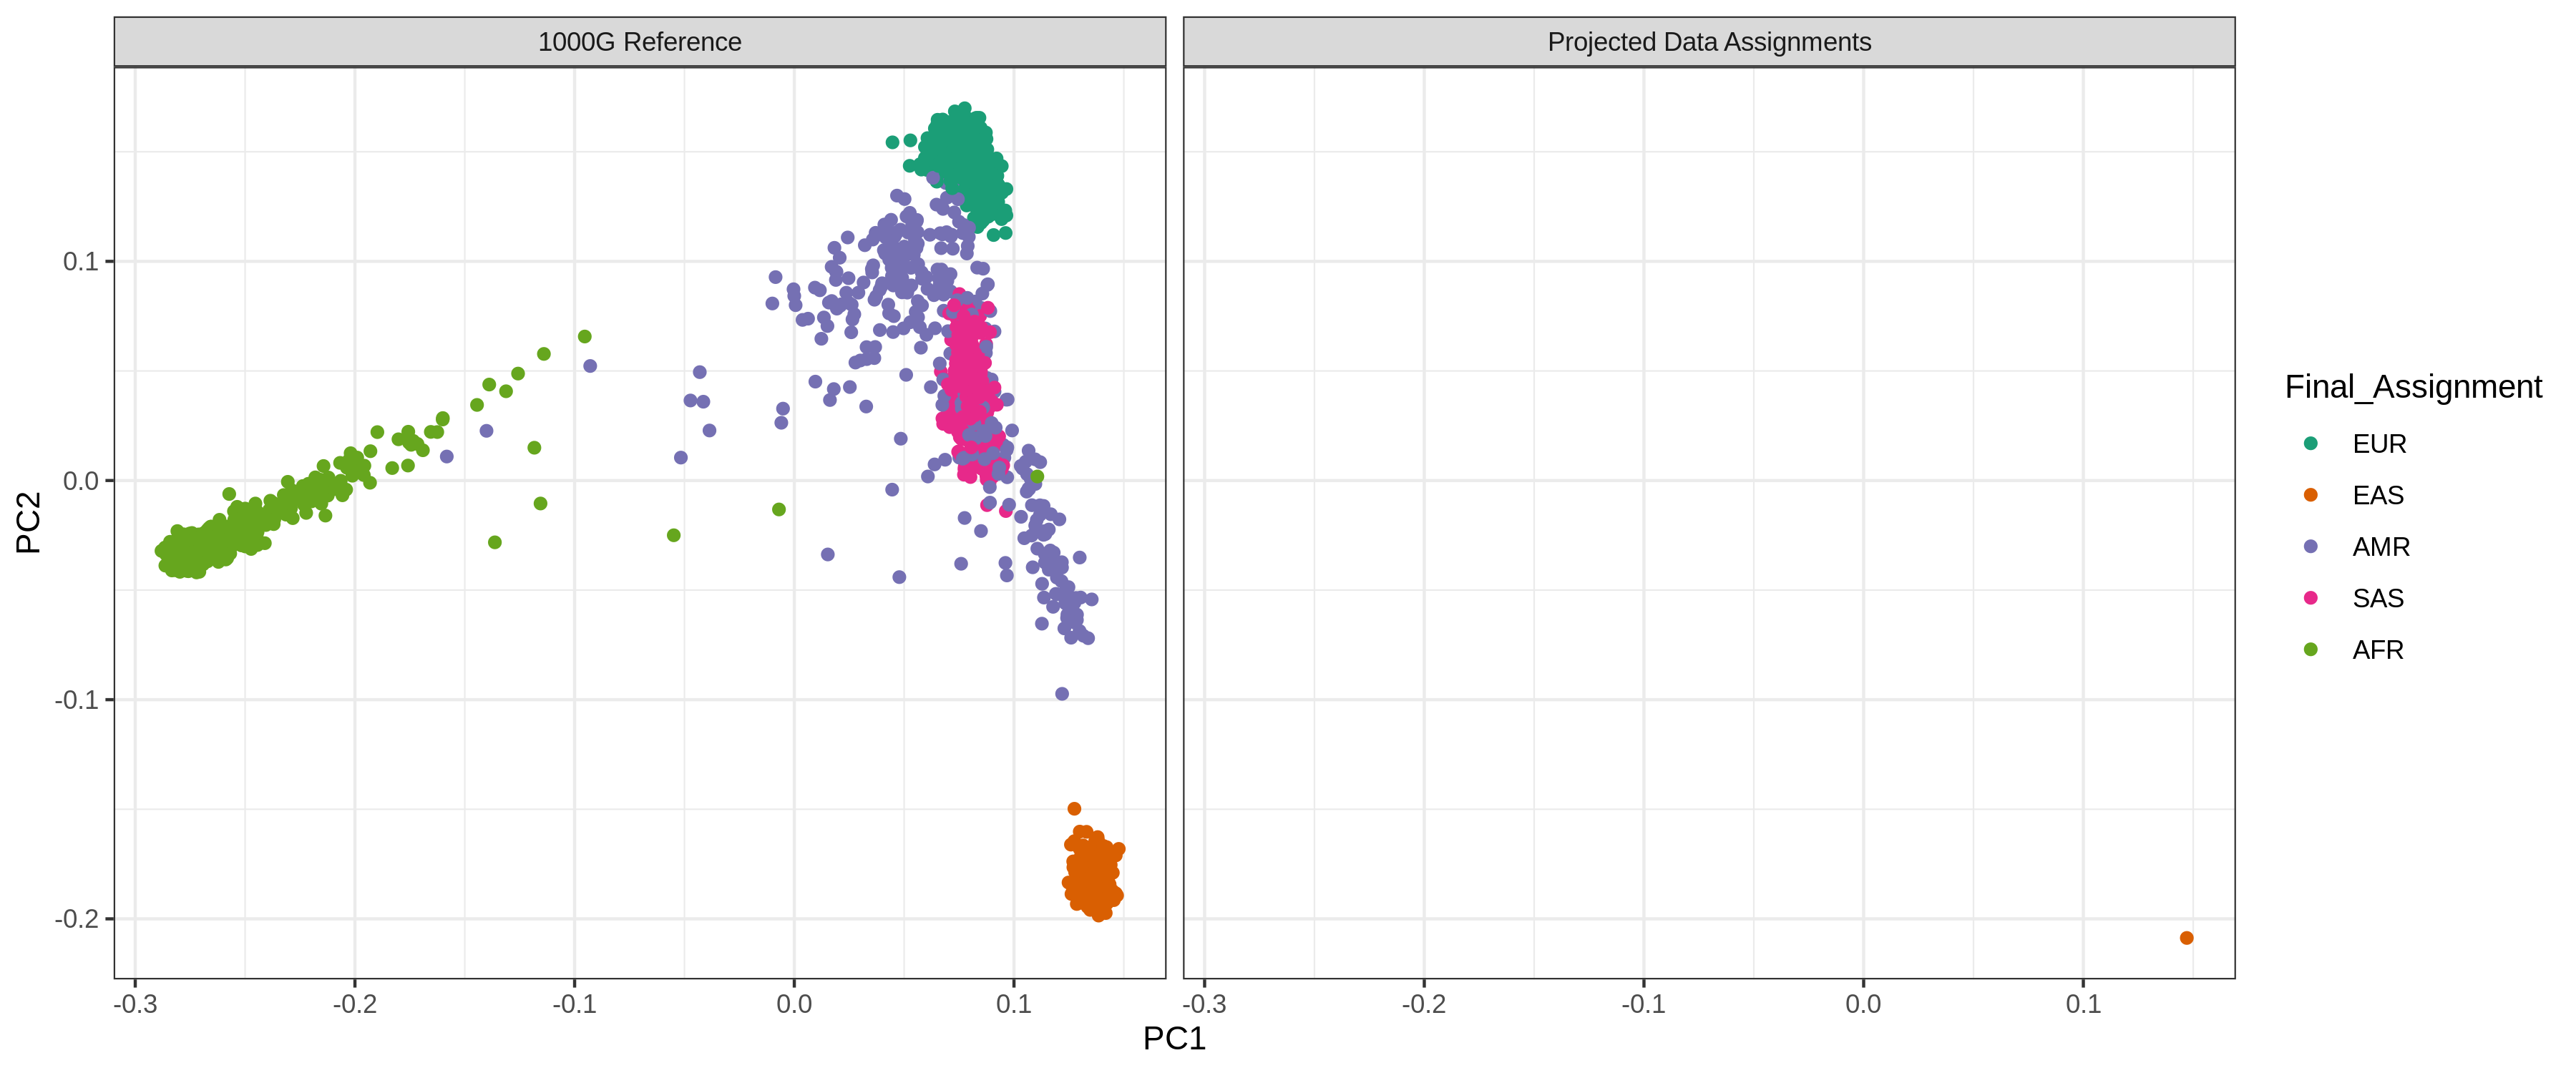
The
ancestry_assignments.tsvfile has the annotations and probabilities for each pool. For example:
FID |
IID |
PC1 |
PC2 |
PC3 |
PC4 |
PC5 |
PC6 |
PC7 |
PC8 |
PC9 |
PC10 |
AFR |
AMR |
EAS |
EUR |
SAS |
Final_Assignment |
|---|---|---|---|---|---|---|---|---|---|---|---|---|---|---|---|---|---|
0 |
Pool1 |
0.137 |
-0.108 |
-0.0250 |
-0.042 |
0.032 |
-0.042 |
0.001 |
-0.021 |
-0.086 |
-0.019 |
0 |
0 |
1 |
0 |
0 |
EAS |